
HO Railroad Track: A Guide to Choosing and Building Your Layout
HO track is the foundation of one of the world’s most popular model railway scales. It provides the rails on which trains run, but it also shapes the layout: track choice affects the appearance of a railway, the space it needs and how reliably trains operate.
What Does HO Mean?
HO scale represents a full-sized railway at approximately 1:87. Its standard track gauge—the distance between the rails—is 16.5 millimetres. The name “HO” comes from “half zero”, referring to its origins as roughly half the size of O scale.
HO should not be confused with British OO gauge. OO models are generally built to a scale of 1:76.2 but run on the same 16.5 mm track. The shared gauge means some equipment can be used across both scales, although the difference in scale can be noticeable when the models are placed together.
Types of HO Track
Model railway track is available in several forms, each suited to different needs:
- Flexible track: Supplied in straight lengths that can be gently curved to suit a layout. It allows realistic, flowing track plans, but needs careful cutting and fixing.
- Set-track pieces: Pre-formed straight and curved sections that connect together. These are convenient for beginners and temporary layouts, though the fixed curve sizes can limit track planning.
- Turnouts: Also known as points or switches, these direct a train from one track to another. They are essential for sidings, passing loops, yards and more complex junctions.
- Crossings and specialist sections: These allow tracks to cross or provide particular connections. Their geometry and electrical arrangements should be checked before they are added to a plan.
Understanding Rail Code
HO track is sold in different rail sizes, commonly described by a “code” number. The number indicates the rail’s height in thousandths of an inch. For example, Code 100 rail is 0.100 inches high, while Code 83 is 0.083 inches.
Code 100 is robust and widely used, making it a practical choice for many layouts. Code 83 and smaller sizes can look more realistic, particularly on main lines or lighter-tracked routes, but compatibility with older or less finely detailed wheelsets should be checked. Some modellers use different rail sizes in different parts of a layout to reflect the character of the railway being modelled.
Planning Curves and Turnouts
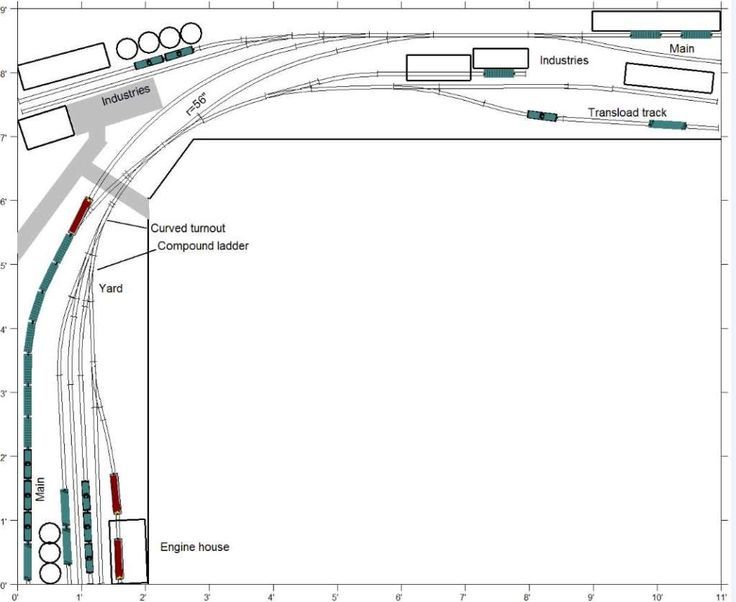
Before buying track, plan the layout around the trains that will use it. A curve that works for a short locomotive and a few wagons may be too tight for a long locomotive or passenger train. Wider curves generally look more convincing and help longer vehicles run smoothly, but they require more space.
Turnouts also need room. Their length and angle affect the shape of sidings and the amount of space available for platforms, buildings and scenery. A full-size paper track plan, or a track-planning programme, can help reveal awkward clearances and tight curves before construction begins.
Trackbed, Fixing and Electrical Connections
Track is often laid on a trackbed made from cork, foam or another suitable material. Trackbed can help reduce running noise and provides a raised base that can be shaped to resemble a railway embankment. The track should be supported evenly, with no sudden dips or twists.
Reliable electrical connections are just as important as careful track laying. Rail joints should be clean and aligned, and longer layouts may benefit from additional power feeds rather than relying solely on the rail joiners. With digital command control (DCC), good electrical continuity helps locomotives respond consistently across the layout. Any wiring should be planned clearly, with polarity and turnout requirements taken into account.
Keeping HO Track in Good Condition
Dust, dirt and residue can interrupt electrical contact and cause trains to hesitate or stop. Regularly inspect the rails, remove debris and clean the running surfaces with a product suitable for model railway track. Avoid abrasive materials that could scratch the rail. Check too that joints remain level and that points move freely.
Building a Better Railway
Choosing HO track is a balance between space, appearance, budget and the trains you want to run. A simple plan with broad curves, well-laid track and dependable electrical connections will often provide a better experience than a crowded layout with too many features. With thoughtful planning and regular care, HO track can support anything from a compact switching layout to an expansive model railway.
6 Tips for Laying HO Scale Model Railway Track
- Choose track to suit your layout size.
- Plan curves with gentle bends.
- Keep rails clean for reliable running.
- Join sections firmly and align the rails.
- Secure track without forcing it into place.
- Test trains slowly before ballasting.
Choose track to suit your layout size.
Choose track that suits the size of your layout and the trains you plan to run. In a compact space, set-track sections can make it easier to create a simple, reliable plan, while flexible track offers more freedom on larger layouts and can help you form smoother curves. Allow enough room for trains to navigate bends and turnouts comfortably, and remember to leave space for scenery, buildings and access for maintenance.
Plan curves with gentle bends.
Plan curves with gentle bends to help trains run smoothly and give your HO layout a more realistic appearance. Broad curves are less likely to cause derailments, particularly with long locomotives and passenger carriages, and look more natural than tight turns. Before laying track, check that your chosen radius fits the available space and suits the trains you plan to run.
Keep rails clean for reliable running.
Keep the rails clean to help your trains run smoothly and reliably. Dust, dirt and oily residue can interfere with electrical contact, causing locomotives to hesitate, stall or lose power. Wipe the rail tops regularly with a soft, lint-free cloth or a cleaner designed for model railway track, and avoid abrasive materials that could scratch the surface.
Join sections firmly and align the rails.
Join each section of HO track firmly, making sure the rail joiners fit securely and the rail ends meet neatly. Keep the rails level and properly aligned at every joint; even a small gap, kink or height difference can cause trains to jolt, derail or lose electrical contact. Before fixing the track in place, run a finger lightly over the joints and test them with a slow-moving train.
Secure track without forcing it into place.
Secure HO track gently, letting it follow the shape of the trackbed rather than forcing it into position. Forcing a curve or straight can twist the rails, create uneven joints and lead to derailments or poor electrical contact. Align each section carefully, use track pins or a suitable adhesive to hold it in place, and check that the rails remain level and smooth before the adhesive sets.
Test trains slowly before ballasting.
Before ballasting your HO track, test every route with trains running slowly in both directions. Watch for derailments, hesitation, loose rail joints and problems at points, and check that longer vehicles clear platforms and scenery. It is much easier to adjust track alignment and fix electrical issues before ballast is glued in place.